The Solaris volume manager, SVM, comes with the latest version of Solaris,
Solaris OE 9. This is know as Solstice DiskSuite[tm] from previous versions of
Solaris. Several new features are present: soft partitions, monitoring active
disks, access via SMC. I will provide a simple guide how you can create a RAID 0
concatenation or stripe, a RAID 1 configuration mirroring the root, var and swap
slices and maybe a RAID 5 in the near future. Please let me know if you find
mistakes or if you have any comments
RAID 0
Concatenation
I will describe how you can create four mount points, /u01 /u02 /u03 and /u04
for Oracle software. This is a basic exercise and should be avoided when are you
planning to setup a real database environment. Concatenation does not offer a
very good I/O performance and better choose a stripe model.
We will use a simple RAID 0 concatenation between two IDE disks (c2t0d0 and
c2t1d0) to do this. As you might see these disks are on the same IDE channel.
Consider using them as separeate channels. On the first disk it is space left
for the last slice, 7th, which will hold four different soft partitions, d1-d4.
On the second disk, c2t1d0, four slices will be created as c2t1d0s0, c2t1d0s1,
c2t1d0s3, c2t1d0s4 where all these will concatenate with the first four soft
partitions from disk one, c2t0d0, in order to create the OFA mount points /u01 –
/u04. Let’s start !
For this example we will use two IDE disks, c2t0d0
and c2t1d0. I think many people can get two cheap IDE disks and play around
under Solaris. The first disk has already six slices defined and I will create
the last slice, the 7th one.
- Search for all disks. Use format command to search for all disks attached
to your system, as root: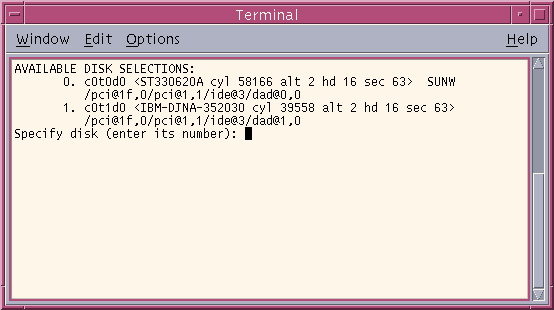
- Disk 1: Select the first disk, c2t0d0 and enter partition menu using ‘p’.
Type ‘7’ for the 7th slice and define a new slice. Make sure you don’t overlap
with any other slice. In the end label the disk using ‘l’. Notice Cylinders column and the interval in defining the slice –
our 7th slice has a size of 2.93GB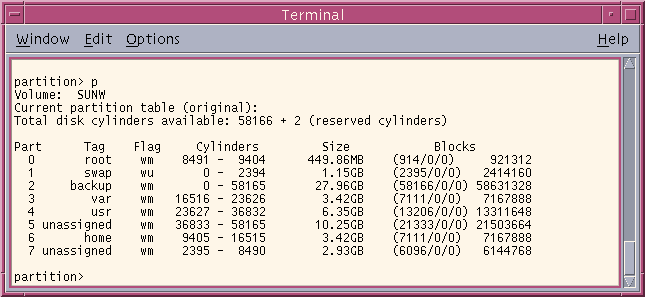
- Disk 2: Now, select disk 1 from format command. Under c2t1d0, we will
create four slices as, c2t1d0s0 6GB, c2t1d0s1 size 6GB, c2t1d0s3 size 2.5GB
and c2t1d0s4 size 4.51GB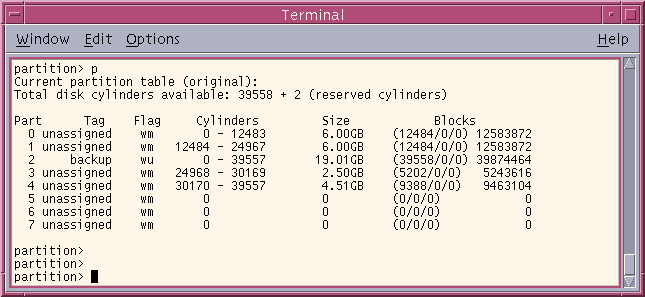
- We will continue below to setup SVM and define the concatenation setup
based on the previous settingsRight now all disks are labelled correctly and all slices defined. Sign the disks using metadb for metadevice state. # metadb -a -f c2t0d0s7 # metadb -a -f c2t1d0s0 Create four soft partitions from c2t0d0s7 as d1,d2,d3,d4 # metainit d1 -p c2t0d0s7 500m d1: Soft Partition is setup # metainit d2 -p c2t0d0s7 500m d2: Soft Partition is setup # metainit d3 -p c2t0d0s7 500m d3: Soft Partition is setup # metainit d4 -p c2t0d0s7 3000m d4: Soft Partition is setup Create stripe (concat) device between: d1 -> c2t1d0s0 d2 -> c2t1d0s1 d3 -> c2t1d0s3 d4 -> c2t1d0s4 # metainit d21 2 1 d1 1 c2t1d0s0 8439.7MB # metainit d22 2 1 d2 1 c2t1d0s1 8444.1MB # metainit d23 2 1 d3 1 c2t1d0s3 3059.9MB # metainit d24 2 1 d4 1 c2t1d0s4 6220.3MB Create UFS File system on previous meta devices, d21 to d24 # newfs /dev/md/rdsk/d21 # newfs /dev/md/rdsk/d22 # newfs /dev/md/rdsk/d23 # newfs /dev/md/rdsk/d24 Create OFA mount points. Mount them as well. # mkdir /u01 /u02 /u03 /u04 # mount -F ufs -o logging /dev/md/dsk/d21 /u01 # mount -F ufs -o logging /dev/md/dsk/d22 /u02 # mount -F ufs -o logging /dev/md/dsk/d23 /u03 # mount -F ufs -o logging /dev/md/dsk/d24 /u04 To finish, make sure to add under /etc/vfstab: /dev/md/dsk/d21 /dev/md/rdsk/d21 /u01 ufs 2 yes logging /dev/md/dsk/d22 /dev/md/rdsk/d22 /u02 ufs 2 yes logging /dev/md/dsk/d23 /dev/md/rdsk/d23 /u03 ufs 2 yes logging /dev/md/dsk/d24 /dev/md/rdsk/d24 /u04 ufs 2 yes logging
>Stripe
We will create a basic stripe between two IDE disks, c2t0d0 and c0t2d0. We
will stripe two slices together to create a mount point, which it will be used
to install some software later on. You can create a stripe using as many
possible slice you like if you have disks.
When you define a stripe create equal size slices ! Previously under
concatenation example you can use different sizes of slices as you like.
Remember than under Solaris SPARC you can have max to 7 slices per disk. Using
Volume manager now you can define soft partitions which extend this limitation.
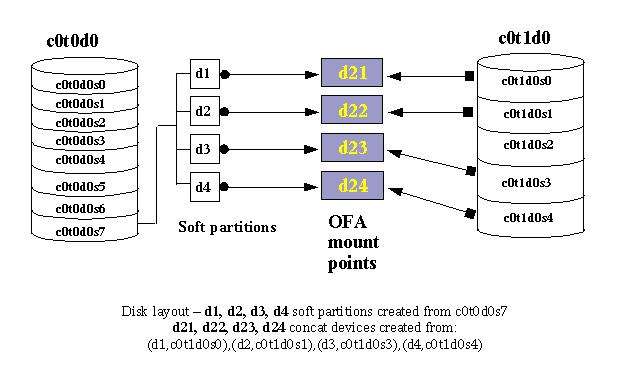
So if we have the following layout of the disk:

As you can see the slice 0 holds the root, slice 1 represents the swap used
under this system and the slice 3 is the var to hold the logs. The 4th slice had
been defined as a dedicated crash dump device. The 7th slice holds the Volume
Manager state replicas. So the 5th slice has space, around 24.41GB free and it
is the only one available under this configuration. We are planning to define
four more slices like /u01 /u02 /u03 and /u04 but we can’t because we have only
two available slices: 5th and 6th. For this we will make use of soft partitions.
We will take the 5th slice and break it into four distinct soft partitions.
Let’s start to define four soft partitions under c2t0d0s5
Create under c2t0d0s5 four different soft partitions: d31, d32, d33, d34 as 6GB, 7GB, 4GB and 7GB: # metainit d31 -p c2t0d0s5 5g d31: Soft Partition is setup # metainit d32 -p c2t0d0s5 9500m d32: Soft Partition is setup # metainit d33 -p c2t0d0s5 7000m d33: Soft Partition is setup # metainit d34 -p c2t0d0s5 9500m d34: Soft Partition is setup To create a stripe you should create the exact four slices to the second disk, c0t2d0: # metainit d41 -p c0t2d0s5 5g d41: Soft Partition is setup # metainit d42 -p c0t2d0s5 9500m d42: Soft Partition is setup # metainit d43 -p c0t2d0s5 7000m d43: Soft Partition is setup # metainit d44 -p c0t2d0s5 9500m d44: Soft Partition is setup Now we have four soft partitions, or we can consider them as four different slices, under first disk and another four equal size soft partitions, to the second disk. We could stripe them and create four mount points to install, Oracle software, for instance. # metainit d51 1 2 d31 d41 d51: Concat/Stripe is setup # metainit d52 1 2 d32 d42 d52: Concat/Stripe is setup # metainit d53 1 2 d33 d43 d53: Concat/Stripe is setup # metainit d54 1 2 d34 d44 d54: Concat/Stripe is setup Our new volumes are: d51, d52, d53 and d54. These will be our mount points what we are looking for. We just have to format and add them to the vfstab. # newfs -v /dev/md/rdsk/d51 # newfs -v /dev/md/rdsk/d52 # newfs -v /dev/md/rdsk/d53 # newfs -v /dev/md/rdsk/d54 Create the mount points: /u01 /u02 /u03 and /u04 and mount the previous volumes # mkdir /u01 /u02 /u03 /u04 # mount -F ufs -o logging /dev/md/dsk/d51 /u01 # mount -F ufs -o logging /dev/md/dsk/d52 /u02 # mount -F ufs -o logging /dev/md/dsk/d53 /u03 # mount -F ufs -o logging /dev/md/dsk/d54 /u04 |
Mirror
For mirroring purpose we would need to have 2 identical hard disks, SCSI,
SATA or PATA. For a cheap solution you could buy 2 SATA disks for less than 150
euros. I prefer Seagate disks. I will describe all these examples under Ultra 10
workstation. We will plan to mirror root, swap and var slices.
First there are couple of things to make sure they are done in order to get a
mirroring solution under Solaris:
- separate the disks to different channels or controllers
- make sure the disks are not attached to the same IDE channel
- configure the hard disks masters and if you have a CDROM switch the CDROM
as slave - remember to change under OBP the order to boot from CDROM
- Run format and configure the first disk. After when you define the layout
what you would like to have start to install Solaris. When you are done
continue with the setup of the mirrorWe have two physical disks:
c2t0d0 and c0t2d0 installed under two different IDE channels (t0,t2) . Please
notice there is only one IDE controller c0. The disks are master configured
Choose ‘0’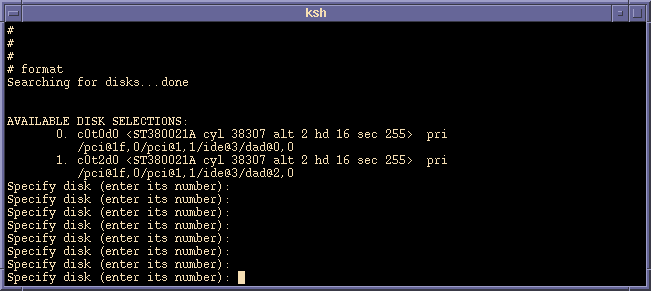
- Define your layout of the disk. I defined: root, swap, var, a slice for
kernel’s crash dumps, a spare slice unassigned at this time and at the last
the 7th a slice for The Volume manager to handle the state replicas.Basically I have a layout defined as:
slice 0 root
slice 1
swap
slice 3 var
slice 4 kernel crash dumps unassigned
slice 7 SVM
replica states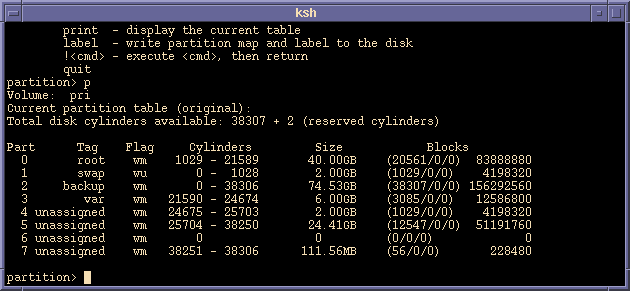
Copy the entire partition table to the second hardisk.
 # prtvtoc /dev/rdsk/c2t0d0s2 | fmthard -s - /dev/rdsk/c0t2d0s2


Install Solaris under first disk, c2t0d0
When are you done let's setup the mirror. First create the replicas,
2 per each disk
 # metadb -a -f -c 2 c2t0d0s7
 # metadb -a -c 2 c0t2d0s7


For the first disk create a simple concat root, swap and var
 # metainit -f d10 1 1 c2t0d0s0
 d10: Concat/Stripe is setup
 # metainit -f d11 1 1 c2t0d0s1
 d11: Concat/Stripe is setup
 # metainit -f d13 1 1 c2t0d0s3
 d13: Concat/Stripe is setup


For the second disk
 # metainit -f d20 1 1 c0t2d0s0
 d20: Concat/Stripe is setup
 # metainit -f d21 1 1 c0t2d0s1
 d21: Concat/Stripe is setup
 # metainit -f d23 1 1 c0t2d0s3
 d23: Concat/Stripe is setup


Create the mirror
 # metainit d0 -m d10
 d0: Mirror is setup
 # metainit d1 -m d11
 d1: Mirror is setup
 # metainit d3 -m d13
 d3: Mirror is setup


Run the following command to make the system to boot from mirror
 # metaroot d0


Check and modify your /etc/vfstab file to reflect the previous changes
 /dev/md/dsk/d1 - - swap - no -
 /dev/md/dsk/d0 /dev/md/rdsk/d0 / ufs 1 no logging
 /dev/md/dsk/d3 /dev/md/rdsk/d3 /var ufs 1 no logging


Reboot your computer and attach all slices from the second disk to the mirror.
Add under OBP the new aliases to reflect the mirror. You can add the new aliases via
OBP or after when you are logged in using eeprom command.
 #metattach d0 d20
 #metattach d1 d21
 #metattach d3 d23


Add the new OBP aliases
 # eeprom nvalias > /tmp/nv


Define the new aliases under one file /tmp/nv as
 devalias bootdisk /pci@1f,0/pci@1,1/ide@3/disk@0,0:a
 devalias mirrdisk /pci@1f,0/pci@1,1/ide@3/disk@2,0:a

 # eeprom ``boot-device=bootdisk mirrdisk''
 # eeprom ``use-nvramrc?=true''
 # eeprom ``nvramrc='cat /tmp/nv'''


Setup the kernel crash dump device
 # dumpadm -d /dev/dsk/c2t0d0s4
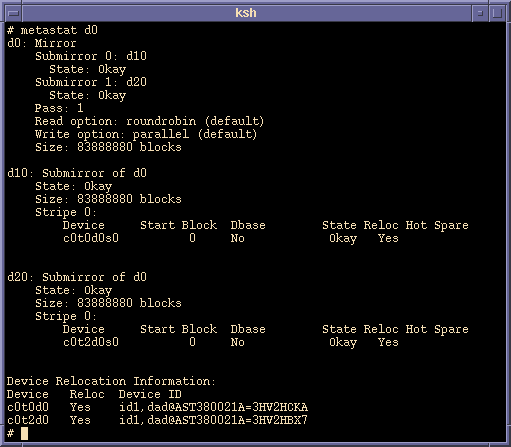
- Now you have to wait until the mirror will resync. Check the state field
to be: Okay. For IDE disks might take some time