The swap command provides a method of adding, deleting, and monitoring the swap areas used by the kernel. Swap area changes made from the command line are not permanent and are lost after a reboot. To create permanent additions to the swap space, create an entry in the /etc/vfstab file. The entry in the /etc/vfstab file is added to the swap space at each reboot.
Displaying the Current Swap Configuration
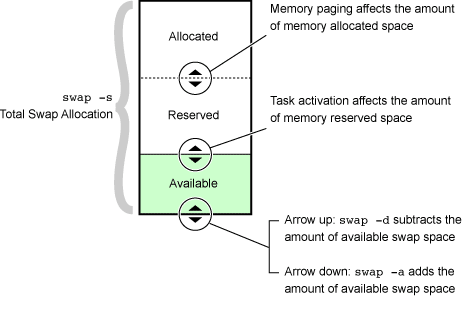
The image shows the relationship between the used swap space, which consists of allocated and reserved swap spaces, and the available swap space.
To view the current swap space allocation, complete the following steps:
-
List a summary of the system’s virtual swap space.
# swap -s total: 41776k bytes allocated + 5312k reserved = 47088k used, 881536k available -
List the details of the system’s physical swap areas.
# swap -l
swapfile             dev  swaplo blocks   free
/dev/dsk/c0t0d0s1   136,9      16 1048304 1048304
Adding Swap Space
When the swap space requirements of the system exceed the current swap space available, you can use the following procedures to add additional swap space to your system.
Adding Swap Slices
To add a swap slice, complete the following steps:
-
Edit the /etc/vfstab file to add information describing the swap slice.
# vi /etc/vfstab #device device mount FS fsck mount mount #to mount to fsck point type pass at boot options ... -
Add the following line to create the swap slice.
/dev/dsk/c1t3d0s1 - - swap - no - -
Use the swap -a command to add additional swap area.
# swap -a /dev/dsk/c1t3d0s1
Adding Swap Files
To add a swap file, complete the following steps:
- Identify a file system that has adequate space to create an additional swap file, preferably on another drive.
-
Make a directory to hold the swap file.
# mkdir -p /usr/local/swap -
Create a 20-Mbyte swap file named swapfile in the /usr/local/swap directory.
# mkfile 20m /usr/local/swap/swapfile -
Add the swap file to the system’s swap space.
# swap -a /usr/local/swap/swapfile -
List the details of the modified system swap space.
# swap -l swapfile dev swaplo blocks free /dev/dsk/c0t0d0s1 136,9 16 1048304 1048304 /usr/local/swap/swapfile - 16 40944 40944 -
List a summary of the modified system swap space.
# swap -s total: 41672k bytes allocated + 5416k reserved = 47088k used, 901200k available -
To use a swap file when the system is subsequently rebooted, add an entry for the swap file in the /etc/vfstab file.
# vi /etc/vfstab
#device     device     mount     FS      fsck    mount     mount
#to mount   to fsck    point     type    pass    at boot   options
...
/usr/local/swap/swapfile	 -	  -	   swap	   -	  no	  -
Removing Swap Space
If you no longer need the additional swap space, you can delete the swap space by removing the additional swap slices and swap files.
Removing Swap Slices
To remove a swap slice, complete the following steps:
-
Delete a swap slice from the current swap configuration.
# swap -d /dev/dsk/c1t3d0s1 - To prevent the swap slice from being configured as part of the swap configuration during a reboot or change of run level, edit the /etc/vfstab file, and remove the swap slice entry from the file.
Removing Swap Files
To remove a swap file, complete the following steps:
-
Delete a swap file from the current swap configuration.
# swap -d /usr/local/swap/swapfile -
Remove the file to free the disk space that it is occupying.
# rm /usr/local/swap/swapfile - To prevent the swap file from being configured as part of the swap configuration during a reboot or change of run level, edit the /etc/vfstab file, and remove the swap file entry.